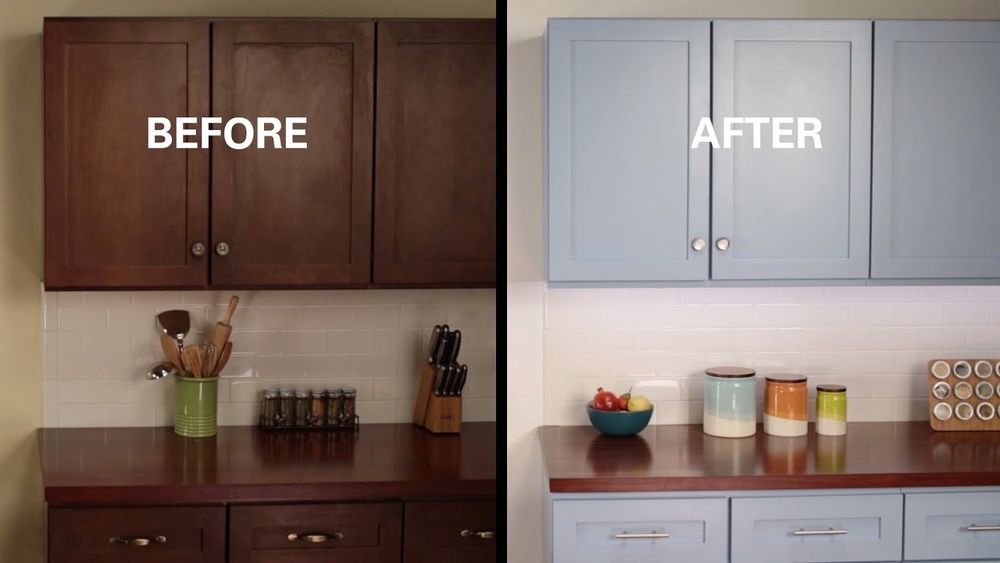
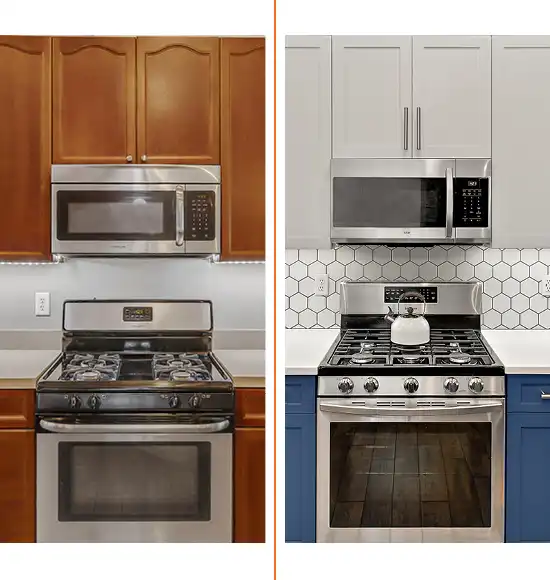
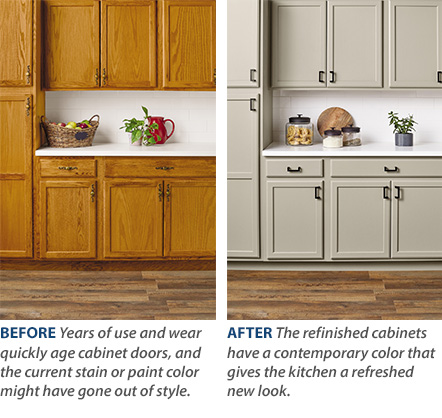
Are your kitchen cabinets looking tired, outdated, or worn out? Refinishing them can be the perfect way to breathe new life into your kitchen without the cost and hassle of a full remodel.
Whether you want a fresh coat of paint or a rich stain that brings out the wood’s natural beauty, you can transform your cabinets with some simple steps and the right tools. In this guide, you’ll discover how to refinish kitchen cabinets like a pro—easy techniques, helpful tips, and common mistakes to avoid.
Ready to give your kitchen a stunning makeover that you’ll love every time you step inside? Let’s get started!
Materials And Tools Needed
Essential supplies include sandpaper, primer, paint or stain, and brushes. Use clean cloths to wipe dust and grease. Choose high-quality paint or stain for good results. Grab painter’s tape to protect areas you don’t want to paint.
Recommended power tools are an electric sander and a drill. Sanders help smooth the cabinet surface faster. A drill can remove and reattach cabinet doors and handles easily. A paint sprayer can be used for a smooth finish but is optional.
Workspace preparation requires a clean, well-ventilated area. Lay down drop cloths to protect floors. Remove cabinet doors and hardware to work more freely. Make sure the space has good lighting to see all details clearly.
Removing Cabinet Doors And Hardware
Start by carefully removing the cabinet doors using a screwdriver. Place the doors on a flat surface to avoid scratches. Keep all screws, hinges, and knobs together. Use small containers or bags to store the hardware.
Label each door and its hardware with masking tape. Write clear marks like “Top Left” or “Bottom Right.” This helps when putting everything back later. Organizing keeps the process smooth and stress-free.
Handle doors gently to prevent damage. Avoid dropping or banging them. Take your time to make sure every piece is safe and accounted for.
Cleaning And Surface Preparation
Start by removing all grease and dirt from the cabinets. Use a mild detergent mixed with warm water and a soft cloth. This step is important to help the new finish stick well. Avoid using harsh chemicals that can damage the wood.
Next, gently sand the surface using fine-grit sandpaper. Sanding creates a smooth base and removes old finish or rough spots. Always sand in the direction of the wood grain to avoid scratches.
Check the cabinets for any holes, cracks, or dents. Fill these imperfections with wood filler. Let it dry completely, then sand the area smooth again. This repair step helps to make the cabinets look new and even.
Choosing Between Paint And Stain
Painting kitchen cabinets gives a fresh, clean look. It hides old stains and damage well. Paint offers many colors to match any style. It works great on MDF or smooth surfaces. Painted cabinets are easier to clean and can brighten a kitchen.
Staining shows the wood’s natural grain and texture. It gives a warm, classic feel that paint can’t match. Stains come in fewer colors but highlight wood beauty. Staining works best on solid wood cabinets. It needs careful application for an even finish.
| Cabinet Material | Best Finish |
|---|---|
| MDF or Laminate | Paint for smooth, even coverage |
| Solid Wood | Stain to enhance wood grain |
| Old or Damaged | Paint to cover flaws |
Applying Primer And Base Coats
Choosing the right primer is key for a good finish. Use a primer made for kitchen cabinets. It sticks well and stops stains from showing through. Oil-based primers work great on wood, while water-based ones dry faster and have less smell.
Apply primer smoothly with a brush or roller. Thin coats help avoid drips and bumps. Lightly sand between coats for a flat surface. Work in thin layers to get even coverage.
| Step | Details |
|---|---|
| Drying Time | Allow 1-2 hours for water-based primers, 6-8 hours for oil-based. |
| Curing Time | Wait 24 hours before applying base coat for best results. |
Patience is important. Rushing can cause peeling or bubbles. Let each layer dry well before the next.
Painting Or Staining Cabinets
Choosing between brush and spray methods depends on the project size and finish quality. Brushes give more control but may leave streaks and brush marks. Sprayers cover large areas quickly and provide a smoother finish, but require practice to avoid drips.
To avoid drips and streaks, apply thin, even coats. Let each layer dry completely before adding the next. Holding the brush or sprayer at the right angle helps spread paint or stain evenly.
| Layer Type | Effect | Tips |
|---|---|---|
| Thin Base Coat | Seals surface, prevents blotches | Apply evenly, avoid thick spots |
| Color Coat | Gives desired color and look | Use multiple thin layers |
| Clear Finish | Protects surface, adds shine | Choose matte, satin, or gloss |
Sealing And Protecting The Finish
Choosing a clear coat is important to protect your cabinet finish. Use a polyurethane or water-based sealer for best results. These clear coats help stop scratches and water damage.
Application tips include using a clean brush or a foam applicator. Apply thin, even coats and let each dry fully before adding another. Sand lightly between coats for smoothness.
Ensuring durability means applying at least two coats of clear finish. Avoid heavy layers that can drip or peel. Keep the room well-ventilated to help drying and curing.
Reinstalling Doors And Hardware
Align hinges carefully to ensure cabinet doors open smoothly. Check each hinge for proper placement before tightening screws. Use a level to keep doors straight and even. Reattach handles and knobs by lining them up with old holes or drilling new ones if needed. Tighten screws firmly but avoid over-tightening to prevent damage.
Make final adjustments by closing and opening doors several times. Look for gaps or misalignment and adjust hinges slightly if necessary. Ensure all hardware is secure and doors close flush with cabinet frames. Small tweaks can improve the overall look and function.
Maintenance Tips For Lasting Beauty
Cleaning painted cabinets regularly keeps them looking fresh and bright. Use a soft cloth with warm, soapy water to wipe away grease and dirt. Avoid harsh chemicals that can damage the paint. Dry the surface well to stop moisture from harming the wood underneath.
Touch-up techniques help fix small scratches or chips. Lightly sand the damaged area with fine-grit sandpaper. Apply matching paint with a small brush for a smooth finish. Let it dry completely before using the cabinet again.
Avoiding common damage means being gentle with cabinet doors and handles. Do not slam doors or hang heavy items on them. Use cabinet liners inside to protect shelves from spills and stains. These simple steps keep your cabinets looking beautiful for years.
Troubleshooting Common Issues
Peeling paint can ruin cabinet looks. Lightly sand the peeling area. Use a good primer before repainting. This helps paint stick well and last longer.
Brush marks show up if paint is thick or brush is rough. Use a soft brush and thin coats. Let each coat dry fully before the next one.
Uneven stain happens when wood absorbs stain differently. Sand the wood smooth first. Apply stain evenly with a cloth or brush. Wipe off extra stain quickly to avoid blotches.
Frequently Asked Questions
Can You Refinish Kitchen Cabinets Yourself?
Yes, you can refinish kitchen cabinets yourself using basic supplies and tools. It requires time, patience, and proper preparation.
Is It Better To Paint Or Restain Kitchen Cabinets?
Painting cabinets offers a modern, customizable look with many color options and smooth finishes. Restaining highlights natural wood grain for a warm, classic style but limits color choices. Choose painting for uniformity and MDF surfaces; select staining to enhance wood’s natural beauty and durability.
Can I Restain Kitchen Cabinets Without Sanding?
Yes, you can restain kitchen cabinets without sanding by using a bonding primer and gel stain for proper adhesion and finish.
Is It Worth It To Resurface Kitchen Cabinets?
Resurfacing kitchen cabinets saves money and time versus replacement. It refreshes appearance and extends cabinet life effectively.
Conclusion
Refinishing kitchen cabinets can refresh your entire kitchen space. It saves money compared to full replacement. Follow each step carefully for best results. Choose paint for a modern look or stain for warmth. Prepare surfaces well to ensure paint or stain sticks properly.
Take your time to avoid mistakes and achieve smooth finishes. With patience and effort, your cabinets will look like new. Enjoy your refreshed kitchen and the satisfaction of a DIY project done right.

Yes, working as , Food Blogger and Product Reviewer for last 6 years. Here you will get amazing deals for Smart kitchen products. I am your best source for the latest update in cooking trends. I provide insightful articles, reviews, and analysis on cutting-edge kitchen gadget. My mission is to empower readers with the knowledge they need to stay ahead in a rapidly evolving coking world. Join me as we explore the future of food technology and how it shapes our lives today and tomorrow.